We have had quite a few calls to the Service Desk about the new HP8500 printers we are handing out and how to print via the WiFi, so I thought I would bring one home and have a go; here is the saga....
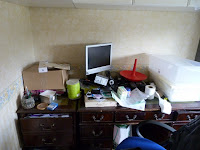
The 1st task is to make some space on the desk, I find the best way is to push everything onto the floor, that way once I have taken the printer out of the box, I can then shovel it up and use the box as a dustbin - perfect for taking down to the local dump - don't worry if there is anything important in there - if it is that important, they will resend you the letter ;-)
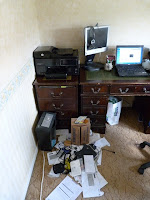
Ye gods! This is a big mo***r fu***r! It is almost the size of my lunchbox for work, I nearly had a hernia getting it out of the box, well at least the box is big enough to take all the crap from my desk that has been piling up since Christmas (I even found some presents I had forgotten about).
Setting up the Printer
So the printer is in place, I have connected up the power, but not the USB cable, this is all about printing via my home WiFi, so let's push the power button on the front and see what happens....
Ohh a little HP logo on the front screen, some rumblings from inside - ahh it is checking itself (I do that when I come out of the loo) - I must admit, I didn't check to see if the last owner had left me any paper in the tray.
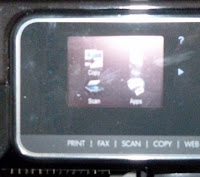
Ok so now all the comotion has stopped, I am left with a printer, with a very slick front panel, with pictures for
Copy, Fax, Scan and
Apps; there is also a WiFi antenna showing in the top right corner - next to the screen is a
? and an
> lit up in blue - intuitive, well me with a brain the size of a planet, I can say I am a bit flummoxed as to what to do next (God forbid that I should ever read the manual).
Ahh so the
> goes to the next screen, with
Setup, Ink Status, Photo and
Auto Answer On - the
? goes to a list screen with
Help Topics, Discover, Product Tour and
Print Demo Page.
Decisions, decisions....
Setup has got to be the way forward, from the choices under
Setup, I will go for
Network - good guess, I can see a
Wireless option.
Ohh there is now an option for Wireless Setup Wizard (I wonder what that does), seems I may be on the right path here. It is telling me that it is going to help me to set up a wireless connection for the printer - how nice, I must
Continue.
Ahh it is now searching for WiFi connections, and it gives me a nice list to choose from - I can see my network name (SSID) so I press that option. It is telling me that my connection has no encryption, well I set my WiFi up differently from most (I have to be different don't I) - usually I would expect it to tell me that it is encrypted with a WPA passphrase, I would need to have that handy to set up the next step.
So, choosing my network name, and pressing the
Continue option, it tries to connect and eventually connects to my network giving a good signal. A BIG blue WiFI antenna symbol appears in the bottom right of the display - this must be good. I get the choice of
OK or
Print - as I haven't printed anything yet I give it a go. This gives me a nice printout of all the information about my wireless connection, including the IP address that it has picked up from my router - nice touch.
Setting up the laptop
So, with the printer set up, I now need to get my Windows7 laptop to see the printer - I will start with the
Devices and Printers option from the
Start menu.
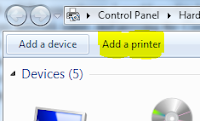
Let us
Add a printer - and then
Add a network, wireless or Bluetooth printer.
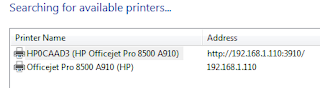
Hmm, I get a choice - both the same printer, but if you look at the address, one is a HTTP web address and the other is a pure IP address - I think I will go for the second option Officejet Pro 8500 A910 (HP).
Clicking Next, brings me to the Drivers screen, I had a quick look through to see if I had the drivers for this printer already loaded, it was close but no bannana - therefore I need to rummage through the box of 'stuff' that came with the printer, to find the setup CD - I could then bung that in and choose the
Have Disk option. Unfortunately there is no CD in the box - (my fault for using a printer that came back from a leaver) - so a quick visit to the HP Support site has provided me with the latest drivers.
Note! Roche employees should have the printer drivers already loaded on their Roche laptops, if they haven't contact the Service Desk, who will assign the drivers to your machine.
So going back to our choice of Officejet Pro 8500 A910 (HP) printer and the
Install the Printer Driver screen, I looked under Hewlett-Packard, and found the HP Officejet Pro 8500 A910 - highlighting this I clicked
Next - the next screen then told me that the driver was already installed - I was happy to use that one, so clicked
Next again.
I was then asked to give the printer a name - OK you can go with the default name supplied, but I called mine Algenon.
I was then asked if I wanted to share this printer - now 1st thoughts would be 'of course I want to share this printer', but be careful, this is about sharing the printer from your laptop, I do not want to have to have this laptop on so that others in my house can print - they can set up their own damn printer as I have just done - so I chose not to share the printer.
At last I came to the last page of the Wizard, I left the box checked as my default printer, I clicked on the
Print a test page button, just to make sure it printed ok, then clicked the
Finish button.
Job Done!
So now in my Devices and Printers windows I have a new icon.
Double clicking the icon brings up a new window with LOADS of choices to play with, including changing the settings on the printer, scanning options, fax options and the HP ePrintCenter - that should be for another Blog methinks...
Scanning
So choosing the Scan a Document or Photo option, brought up the scanner window - pressing the Scan button started the printer off on it's scan cycle (I had put a document in the feeder for this already) - it took a while to do an A4 sheet, but got there in the end.
Cool - I have managed to set up my printer and scanner, without attaching a cable from my laptop to the printer or using a CD (I don't count downloading the drivers from the HP website) - in fact apart from putting the printer on the desk, that is the only manual part of the business, the rest of the time I sat on my arse.


